Sequelize — Getting Started, Configuring Sequelize with Node JS.

Have you ever wondered how software engineers seamlessly manage database interactions without the hassle of writing complex SQL queries? For many, manually crafting queries for each database operation is a tedious task. Fortunately, there’s a smarter solution. Let me introduce you to Object-Relational Mappers (ORMs) — a powerful tool that simplifies database management and query execution.
In the realm of Node.js, one ORM stands out for its simplicity and efficiency: Sequelize. This powerhouse not only supports multiple databases but also simplifies the setup and management process, making it a top choice for developers looking to elevate their database game. Ready to ditch the manual query grind and embrace a more elegant solution? Let’s dive into configuring Sequelize, and discover how this ORM can transform your database management experience.
Installations
Getting started with Sequelize in Node.js is straightforward. Simply install ‘Sequelize’ along with the dialect corresponding to your chosen database — for example, MySQL.
In this tutorial, we’ll configure Sequelize for a MySQL database with a single command:
npm install sequelize sequelize-cli mysql2For other databases, perhaps some of the commands below can help:
npm install sequelize mariadb          // For Maria DB
npm install sequelize pg pg-hstore     // For PostgreSQL
npm install sequelize-oracle oracledb  // For Oracle Dialect
That was it for the installations.
Key Steps
For Configuring Sequelize with Node JS, you need following things:
- A Configuration Object that tells the server that where to connect.
- An Environment Setup that uses this configuration object, makes connection to database & maps models on Database Tables.
- Models: You need to create a model for the table you have in your database to allow the server to make changes & get data from the tables in the database.
To efficiently configure Sequelize ORM with Node.js, let’s break down the key steps you’ll need to follow:
Creating a Configuration File.
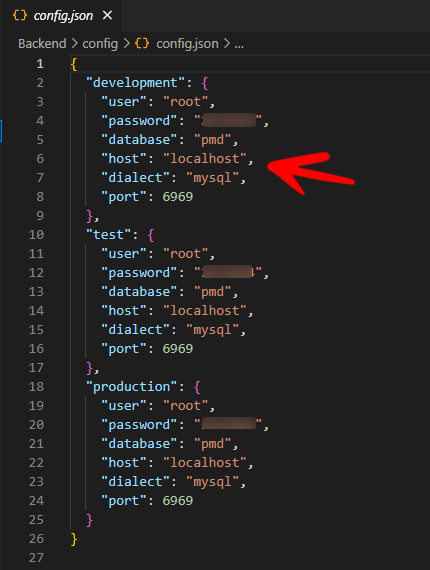
Start by creating a ‘Config’ folder and within it, add a ‘config.json’ file. This file will house your database credentials such as the database name, username, password, port, and host.
For other database’s dialects you can add them in config file as:
"dialect": "oracle"   // For Oracle
"dialect": "mariadb", // For MariaDB
"dialect":"postgres"  // For PostgreSQL
You can also use Multiple Dialects in the same Config File like this:
{
  "development": {
    "username": "db_user",
    "password": "db_password",
    "database": "db_name",
    "host": "127.0.0.1",
    "dialects": {
      "postgres": {
        "dialect": "postgres"
      },
      "mariadb": {
        "dialect": "mariadb"
      },
      "oracle": {
        "dialect": "oracle",
        "dialectOptions": {
          "connectString": "127.0.0.1/XEPDB1"
        }
      }
    }
  }
}
Configuring Connection Environment
- Create “Index.Js” file in a new folder named “Models” to map models in server and using configuration file to make connection to database. Just copy & paste the code below in Index.Js file and we are done.
'use strict';

const fs = require('fs');
const path = require('path');
const Sequelize = require('sequelize');
const process = require('process');
const basename = path.basename(__filename);
const env = process.env.NODE_ENV || 'development';
const config = require(__dirname + '/../config/config.json')[env];
const db = {};

let sequelize;
if (config.use_env_variable) {
  sequelize = new Sequelize(process.env[config.use_env_variable], config);
} else {
  sequelize = new Sequelize(config.database, config.user, config.password, config);
}

fs
  .readdirSync(__dirname)
  .filter(file => {
    return (
      file.indexOf('.') !== 0 &&
      file !== basename &&
      file.slice(-3) === '.js' &&
      file.indexOf('.test.js') === -1
    );
  })
  .forEach(file => {
    const model = require(path.join(__dirname, file))(sequelize, Sequelize.DataTypes);
    db[model.name] = model;
  });

Object.keys(db).forEach(modelName => {
  if (db[modelName].associate) {
    db[modelName].associate(db);
  }
});

db.sequelize = sequelize;
db.Sequelize = Sequelize;

module.exports = db;
Creating Models
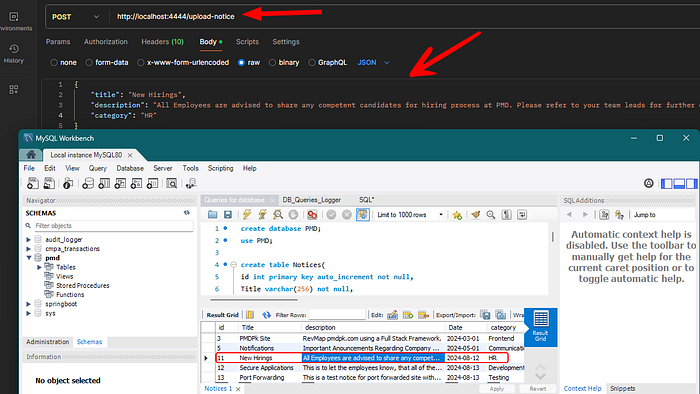
Now, think what attributes your table in the database has. Let’s say this was your table in the database:
create table Notices(
id int primary key auto_increment not null,
Title varchar(256) not null,
description varchar(256) not null,
Date varchar(20) not null,
category varchar(256) not null
);
This will be the model you will create in your Models Folder for the above table:
module.exports = (sequelize, DataTypes) => {
    const Notices = sequelize.define('Notices', {
      id: {
        type: DataTypes.INTEGER,
        autoIncrement: true,
        primaryKey: true,
        allowNull: false
      },
      Title: {
        type: DataTypes.STRING(256),
        allowNull: false
      },
      description: {
        type: DataTypes.STRING(256),
        allowNull: false
      },
      Date: {
        type: DataTypes.STRING(20),
        allowNull: false
      },
      category: {
        type: DataTypes.STRING(256),
        allowNull: false
      }
    }, {
      tableName: 'notices',
      timestamps: false
    });

    return Notices;
  };
Use “Datatypes.” to set the data type of the attribute and use other options like shown above to completely imitate your database table.
And We are Done. Now what we need to do, is just import this model in our server and make changes. Import the Model in your Server.js like this:
Server Implementation
const {Notices} = db;Remember we exported ‘db’ object that contained mapped models in our 2nd step (Configuring Connection Environment) that was the environment setup and database connection via configuration object in the “Index.Js” file.
Database Synchronization
To make your server synchronized with your database wrap your listening server with “db.sequelize.sync()” as shown below:
db.sequelize.sync().then(() => {
// wrapping the server in sequelize ORM to make DB Requests
    app.listen(port, () => {
        console.log(`Server Listening on Port: ${port}`);
    });
}).catch(error => {
    console.error("Error while starting server:", error);
});
This method ensures your server is synchronized with the database. For example, if your database doesn’t have any tables yet, Sequelize will create the necessary tables based on the models you’ve defined, enabling seamless communication between your server and the database.
Note: You can use other options like ‘sync ({force: true})’ or ‘sync ({alter: true})’ for other database behaviors as well.
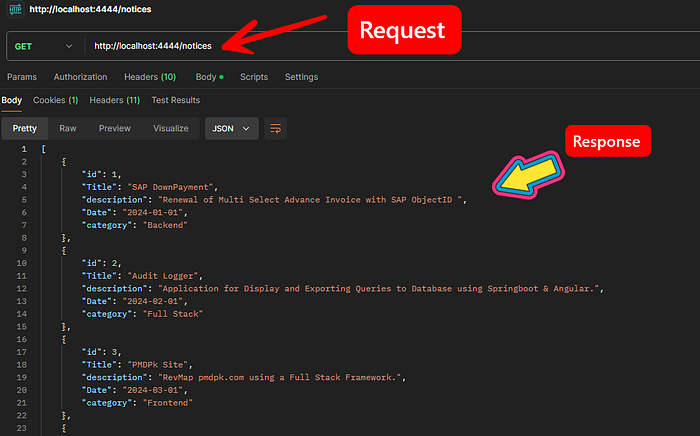
Get Request / Getting Records from database
Now, Let’s Just create a simple API and check if our Database gets Connected. You can use this test API to check your connection & working:
// Function to get all Notices
app.get('/notices', async(req, res) => {
    await Notices.findAll()
        .then(notices => res.send(notices))
        .catch(err => {
            console.error("Error while getting notices:", err);
            res.status(500).send({ "Message": "Could Not Get Notices" });
        });
});
You did not need to write a whole query like “Select * etc” to get all the records from the database. Just Use your imported model and call a method “findAll()” to get all the records as evident below:
Post Request / Adding records to database
Similarly, you can use “create()” method to add a record to the database:
// Uploading a new Notice as an admin
app.post('/upload-notice', async(req, res) =>{
  const data = req.body;
  try {
    await Notices.create(data) // Creating new Notice Record in DB
    res.status(200).send({"Status":"Notice Uploaded Successfully!!"})
  } catch (error) { // handling Errors in case something Goes Wrong
    console.log("Somethibg went wrong while adding Notice: ", error)
    res.status(400).send("Something went Wrong, Check Error on Server side")
  }
})
Other Sequelize Methods
Similarly, you can use other methods like:
1- findOne({where: {condition}}) to find a specific record from the table.
2- Update () to update fields of a specific or all records in a table.
3- destroy () to delete a record from the table.
Conclusion
By now, you’ve witnessed how Sequelize simplifies the process of connecting a Node.js application to a database. From managing configurations and defining models to executing powerful queries with ease, Sequelize proves to be a developer’s best friend when handling databases. Instead of relying on manual queries, you can now leverage Sequelize’s ORM capabilities to streamline your development process and focus more on building robust features for your app.
With this setup, you can easily add records, fetch data, update tables, and more — all through an intuitive API. Whether you’re working with MySQL, PostgreSQL, MariaDB, Oracle, or another relational database, Sequelize abstracts away the complexities and offers a unified approach to database interactions.
So, what are you waiting for? Dive in, set up Sequelize, and take control of your database management like never before. Happy coding! 😉
Don’t Forget to Support & Follow for more tech talks on interesting new technologies.
Feel free to reach me out at huzzaifaasim@gmail.com or in the comment section.